

I was excited to learn how to use Cricut Maker 4 when I first received it, but that excitement quickly turned into nervousness as I unboxed the machine. I had no idea where to start or how to begin using it. Like many beginners, I spent hours scrolling through YouTube videos and reading different blog tutorials, trying to piece everything together. It was overwhelming. That’s why I decided to simplify the process and create this guide, especially for new Cricut users. If you are just getting started, this blog will walk you through the basics. And just so you know – these steps aren’t limited to the Maker 4; they work for most Cricut cutting machines.
Steps for Setting up Your Cricut Maker 4
Before you learn how to use Cricut Maker 4, you need to set up your machine, download the software, register it on Design Space, and connect it to your operating system via USB or Bluetooth.
Step 1: Download Cricut Design Space
- First, go to the official Cricut site (design.cricut.com) and choose your machine model.
- Then, click the Download button depending on your operating system (Windows or macOS).

- On mobile, download the Cricut Design Space app from the Play Store (Android) or Apple App Store (iPhone).
Step 2: Create Your Cricut Account
If you’re a new user, you’ll need to create a Cricut account on the Cricut Design Space app.
- Open the Cricut Design Space Software on your system.
- Click Create ID within the Cricut Design Space. Creating a new Cricut ID involves providing an email address, password, and other required information.
- If you already have an account, simply log in with your existing credentials.
Step 3: Connect Cricut Machine via Bluetooth or USB
Method 1: Using a USB Cable
To connect your machine instantly with your operating system, follow these steps:
- Turn on both of your machines and computers.
- Insert one end of your USB cable into your computer and the other into the machine.
And that’s all, you’ve successfully connected your machine to your device.
Method 2: Through Bluetooth
- First, you need to power on your machine and keep it within 10-15 feet of your computer.
- After that, go to the Start menu and choose Settings.
- Then, select the Devices section.
- Make sure to turn on your Bluetooth and select the + Add Bluetooth or other device option.
- Next, your computer will start searching for nearby Bluetooth devices.
- After that, select your machine model name.
- If prompted, enter the default PIN (usually 0000) or the PIN you have set up.
- Once paired, your machine should appear as a connected device in your Bluetooth settings.
Open Cricut Design Space and select your Cricut machine as the active device during the setup process.
How to Make Storage Jar Labels With Cricut Maker 4?
Here, you’re going to learn how to use Cricut Maker 4 with an easy project guide for making storage labels with your cutting machine. Through this guide, you will be able to use it more efficiently and practically. So let’s begin!
As you have already downloaded the Cricut Design Space software on your device, open it and follow the instructions listed below carefully:
Step 1: Click New Project within the Cricut Design Space’s Home page. Step 2: Then, go to the Text menu on the left-hand side of the panel and type your essentials like Sugar, Tea, Biscuits, and Coffee. Don’t forget to press Enter after each word so that you can cut them separately.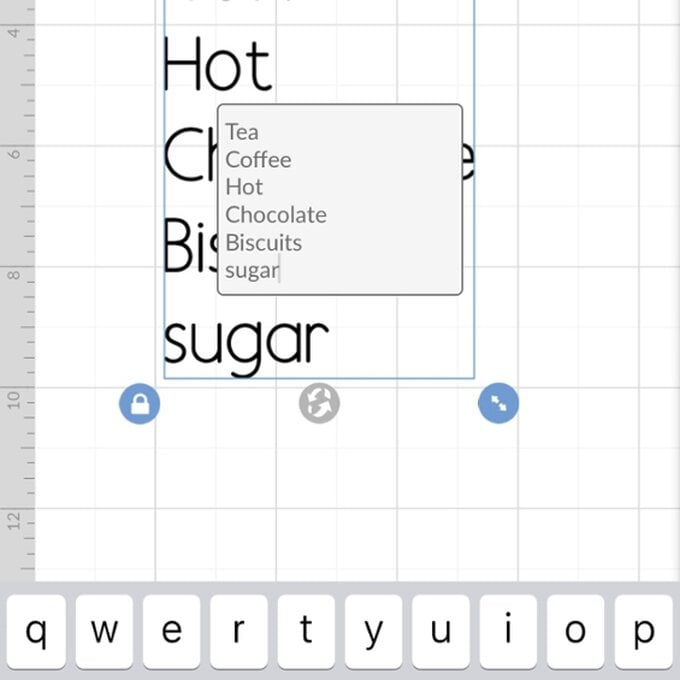 Step 3: Select the Edit icon and adjust the font size and align them in the center.
Step 4: Once you’re satisfied with your project, click the green Make It button.
Step 5: After clicking on the Make It button, the mat preview screen will appear on your screen. Click Continue.
Step 6: Cut a piece of vinyl slightly larger than your design, and place it on your mat.
Step 7: Within the Cricut Design Space, select the Premium Vinyl as your material.
Step 8: Load your mat into your crafting machine and press the Cricut button when it starts to flash.
Step 9: Remove the unwanted area using a weeding tool.
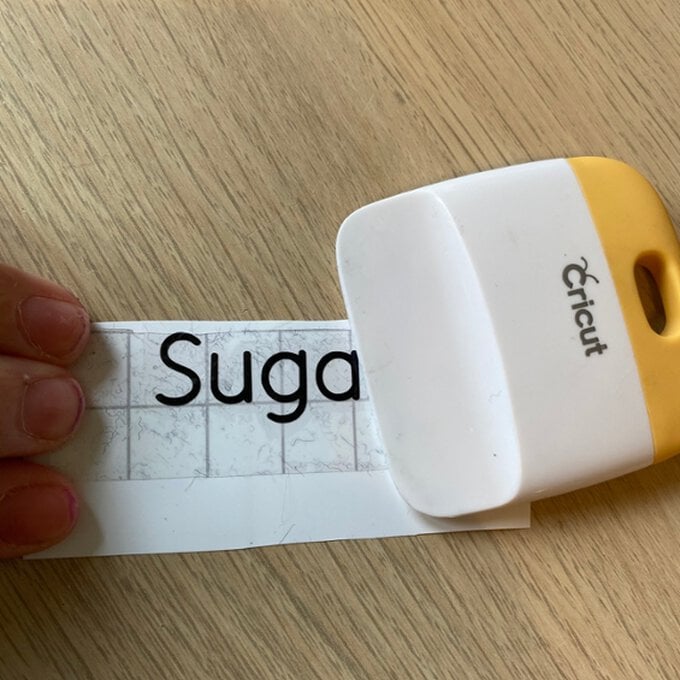
Step 10: Cut down a piece of transfer tape, larger than your design, and place it over the label. Use a scraper tool to smooth out the surface.
Step 3: Select the Edit icon and adjust the font size and align them in the center.
Step 4: Once you’re satisfied with your project, click the green Make It button.
Step 5: After clicking on the Make It button, the mat preview screen will appear on your screen. Click Continue.
Step 6: Cut a piece of vinyl slightly larger than your design, and place it on your mat.
Step 7: Within the Cricut Design Space, select the Premium Vinyl as your material.
Step 8: Load your mat into your crafting machine and press the Cricut button when it starts to flash.
Step 9: Remove the unwanted area using a weeding tool.
Step 10: Cut down a piece of transfer tape, larger than your design, and place it over the label. Use a scraper tool to smooth out the surface.
 Step 11: Once you’re done with scraping, place the label on your jars carefully to adhere the vinyl. Now, peel off the transfer tape to reveal your final design.

Frequently Asked Questions (FAQs) Why Is My Cricut Maker 4 Not Connecting?
To ensure proper connectivity of your cutting machine, follow the instructions given below:
- If using a computer, ensure your Bluetooth adapter drivers are up to date.
- Keep your machine within 15 feet (4.5 meters) of your device for a stable connection.
- Try moving your machine and device away from other electronic devices as they interfere with Bluetooth.
- Remove any existing pairings and then attempt to pair it again.
- Make sure your computer or phone is connected to a stable Wi-Fi network.
How Can I start with Cricut Maker 4?
If you are new to Cricut, start here:
- First, you have to download and install Design Space on your system.
- Then, create a Cricut ID (an account) during the setup process.
- Now, it’s time to connect your device using the provided USB cable or via Bluetooth.
- Activate the machine, load the material, and perform a test cut.
If your machine cuts successfully, you can start designing and cutting your own projects.
What materials can Cricut Maker 4 cut?
The Cricut Maker 4 can cut over 300+ materials, including popular ones like vinyl, iron-on, glitter iron-on, holographic iron-on, and cardstock, as well as more specialized materials such as faux leather, poster board, and even thin wood. It also handles fabrics, felt, cotton fabrics, fusible fabric, printable fabric, and various other papers.
Other materials include Balsa wood and basswood, metallic leather, Cricut aluminium sheets, printable magnet sheets, Foil acetate, and craft foam.
 :
https://pinterest.com/cricricut
:
https://pinterest.com/cricricut


