Door painting might appear like a straightforward domestic enhancement errand, but accomplishing a professional-looking wrap-up requires more than just slapping on a coat of paint. Whether you’re reviving inside entryways for an advanced overhaul or giving your front entryway a striking modern look to boost control requests, legitimate arrangements and procedures are pivotal. This master guide covers everything you require to know around entryway painting—from materials and strategies to master tips that guarantee long-lasting results.
As proficient painters at Top Cut Painting, LLC, have learned through a long time of experience, a well-painted entryway is not just about aesthetics—it’s also about securing the surface, upgrading solidness, and contributing to the general fashion and esteem of your property.
Why Entryway Portrayal Matters
Your entryways as like door painting take an everyday beating—slamming closed, consistent touching, changing climate conditions, and exposure to dampness or warmth. Over time, these variables cause the paint to chip, blur, or split, making your entryways look tired and worn.
Door portray is a reasonable, high-impact overhaul that:
Improves first impressions (particularly front entryways)
Extends the life expectancy of wooden doors
Helps anticipate decay and water harm (for outside doors)
Complements inside décor and color schemes
Whether you’re arranging to offer your domestic or fair services or require a revived look, portraying your entryways is a beneficial investment.
Types of Entryways and Paint Options
Interior vs. Outside Doors
Understanding the contrasts in entryway sorts is fundamental for selecting the right paint and method:
Interior entryways as a rule require latex or acrylic paint with a semi-gloss or glossy silk wrap to withstand frequent cleaning.
Exterior entryways confront the elements and require more vigorous protection—typically oil-based or exterior-grade latex paint that stands up to peeling, UV harm, and moisture.
Door Materials Matter
The fabric of the entryway also influences the portrayal process:
Wood entryways may require sanding and preparing to dodge bleed-through.
Metal entryways require rust-resistant preliminary painting sometime recently.
Fiberglass entryways require uncommon holding preliminaries to guarantee adhesion.
Step-by-Step Direct to Entryway Painting
1. Evacuate the Entryway (on the off chance that’s possible)
While it’s not obligatory, evacuating the entryway from its pivots permits easier and a smoother wrap-up. Lay the entryway level on sawhorses in a well-ventilated area.
2. Clean Thoroughly
Use a degreaser or mellow cleanser to clean the surface. Oil, fingerprints, and soil can prevent the paint from following properly.
3. Sand the Surface
Lightly sand with 120–220 coarseness sandpaper to make a smooth, even surface. For already painted entryways, a sand fair is sufficient to evacuate the sheen.
4. Repair and Fill
Use wood filler to settle any scratches, scratches, or defects. Once dry, sand the fixed ranges smooth.
5. Prime the Door
Priming is particularly critical if you’re changing colors, covering stains, or working with uncovered wood or metal. Utilize a quality preliminary suited to your door’s material.
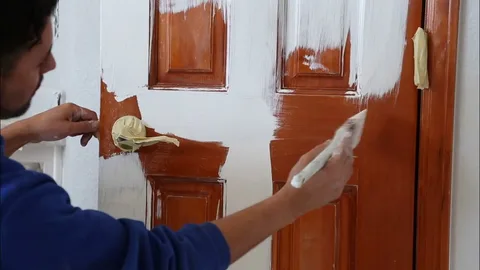
6. Paint with Legitimate Technique
Use a combination of brush and roller or a sprayer for indeed scope. Begin with recessed boards utilizing a brush; at that point utilize a roller for level surfaces. Take after the grain of the wood or the normal course of the door’s design.
Let the beginning coat dry totally (ordinarily 4–6 hours depending on the paint); at that point apply a second coat for full scope and durability.
Common Entryway Portrayal Botches to Avoid
Even experienced DIYers make botches when it comes to entryway portrayal. Here’s what to avoid:
Skipping preliminary on recolored or uncovered surfaces
Painting over soil or grease
Using low-quality brushes or paint
Not permitting sufficient drying time between coats
Ignoring climate conditions when portraying outside doors
How Long Does the Entryway Portray Last?
A professionally painted inside entryway can last 5–7 years, whereas outside entryways may require repainting every 3–5 years, particularly in high-exposure ranges. Utilizing high-quality paint and appropriate prep procedures will amplify the life of the paintwork significantly. If you want to enhance your door paintwork so visit the Top Cut Painting, LLC and no need to forget it.
Top Tips from Professionals
Here are a few expert-approved tips to raise your entryway’s portrayal results:
Choose a high-quality paint: Contributing to premium paint guarantees way better scope, color maintenance, and durability.
Don’t rush the work: Let each layer dry completely some time recently before recoating or reinstalling.
Use painter’s tape: Veil off pivots, handles, or glass boards for clean lines.
Avoid painting in muggy or cold conditions: paint may not remedy appropriately, leading to peeling or bubbling.
Label equipment: If expelling entryway handles or pivots, name them for simple reassembly.
Best Paint Wraps Up for Doors
When it comes to wraps, here’s how to choose:
Gloss or Semi-Gloss: Perfect for both inside and outside entryways due to their solidness and easy-to-clean surface.
Satin: Offers a milder luster with conventional durability—great for advanced interiors.
Matte or Level: Not prescribed for high-touch surfaces like doors.
Final Thoughts
Door painting is a cost-effective way to revive your home’s appearance, boost security, and express fashion. With the right planning, materials, and method, indeed a tenderfoot can accomplish professional-quality work. Keep in mind to factor in the sort of entryway, its fabric, and area (inside or outside) when arranging your project.
For those who favor master offers of assistance, contracting a proficient portrayal benefit like Top Cut Painting, LLC guarantees the work is done proficiently, with master exactness and a clean wrap-up that keeps going for years.
Whether you go the DIY course or enlist stars, understanding the essentials of entryway portrayal will spare you time, exertion, and cash in the long run.
Frequently Asked Questions (FAQs)
Do I need to evacuate the entryway sometime recently to portray it?
No, but expelling it makes the preparation simpler and makes a difference in you maintaining a strategic distance from trickles. If you paint it in place, tape off encompassing dividers and flooring carefully.
Can I paint over an ancient painted entryway without sanding?
It’s not suggested. Sanding makes a difference; the modern paint bond is superior and anticipates peeling or chipping later.
How do I anticipate brush marks when portraying doors?
Use a high-quality calculated brush or a froth roller for smoother application. You can also utilize a paint sprayer for an immaculate finish.
What’s the best color for entryway painting?
Popular choices incorporate unbiased tones for adding (white, beige, or gray) and strong colors like ruddy, navy, or dark for front entryways to upgrade curb appeal.
How many coats are vital for entryway painting?
At least two coats of paint are more often than not suggested for strong, long-lasting scope.
 :
https://www.pinterest.com/topcutpaintingllc/
:
https://www.pinterest.com/topcutpaintingllc/